
WPScale offers domain name registration. If you want to buy and manage your domain names and email addresses directly from the WPScale console, visit our dedicated documentation.
If your domain name was purchased from a registrar other than WPScale, you must follow the procedure in this manual.
You can also read our article on our recommendations here: https://www.wpscale.com/docs/hosting/wpscale-domains-and-email-addresses/.
If you know how to change your DNS with your registrar, point your domain (@ and www) to the IP of your WPScale account.
- You must point the root domain (mysite.com) to the IP of your WPScale account
- You have to point the www (www.mysite.com) to the IP of your WPScale account
- Attention: no CNAME nor IP V6 (AAAA)
- Note: If you have a personal IP, you’ll need to point to it.
- To find out the IP address to point your domain to, go to your account and you’ll see it highlighted at the top of the page: My Account.
- For the address of your console, go to https://www.wpscale.com/my-account/.
WARNING : for correct implementation of the change procedure, the following steps must be carried out: (Otherwise, your SSL certificate will not be valid and you’ll get a security error).
1 - Creation or modification of TYPE A entries with your registrar: WWW and without WWW
2 - Wait and check that the DNS point to your WPScale IP
3 - Add the domain name in the WPScale console
If you don’t feel comfortable with this operation, we can take care of it, otherwise simply follow the instructions below:
Then check if your DNS point to the WPScale IP using the verification tool at https://www.whatsmydns.net. If this is the case, make the modification from the console with the "Modification NDD" button, as in the following procedure: Register the domain name in the console.
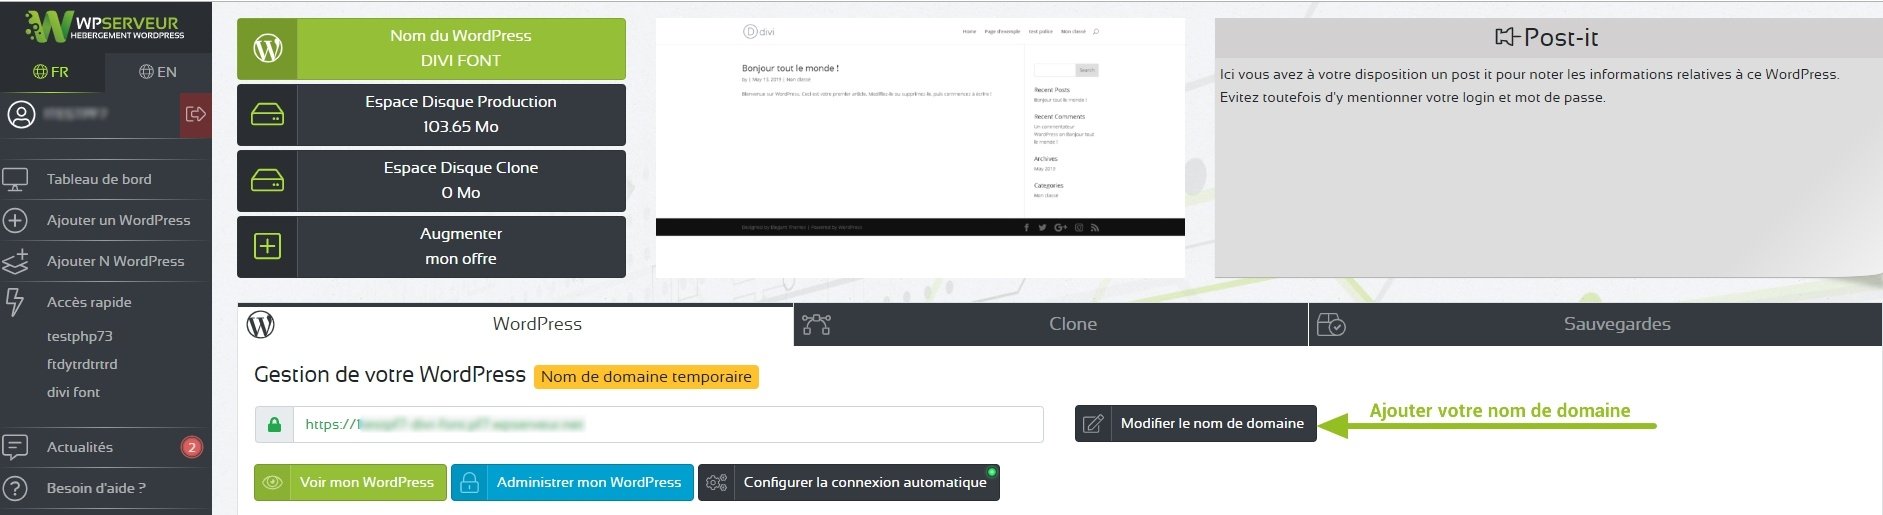
Once this has been done, you need to modify all your URLs so that your site displays correctly, using your domain name rather than the temporary WPScale URL.
To do this, you can use our following article explaining the use of the SRDB tool: Change your links easily with SRDB.
Also, we advise you then go to your WordPress administration in Settings => Permalinks, to check the configuration, and save the page settings, even if everything seems already correct, to avoid having errors of inaccessible pages on your site.
BOOKMYNAME PROCEDURE
!!! WARNING!!! Don’t take into account the IP mentioned for the example in the video tutorial.
Here below is the IP to which to point your Domain:
Name: [display-ip-console]
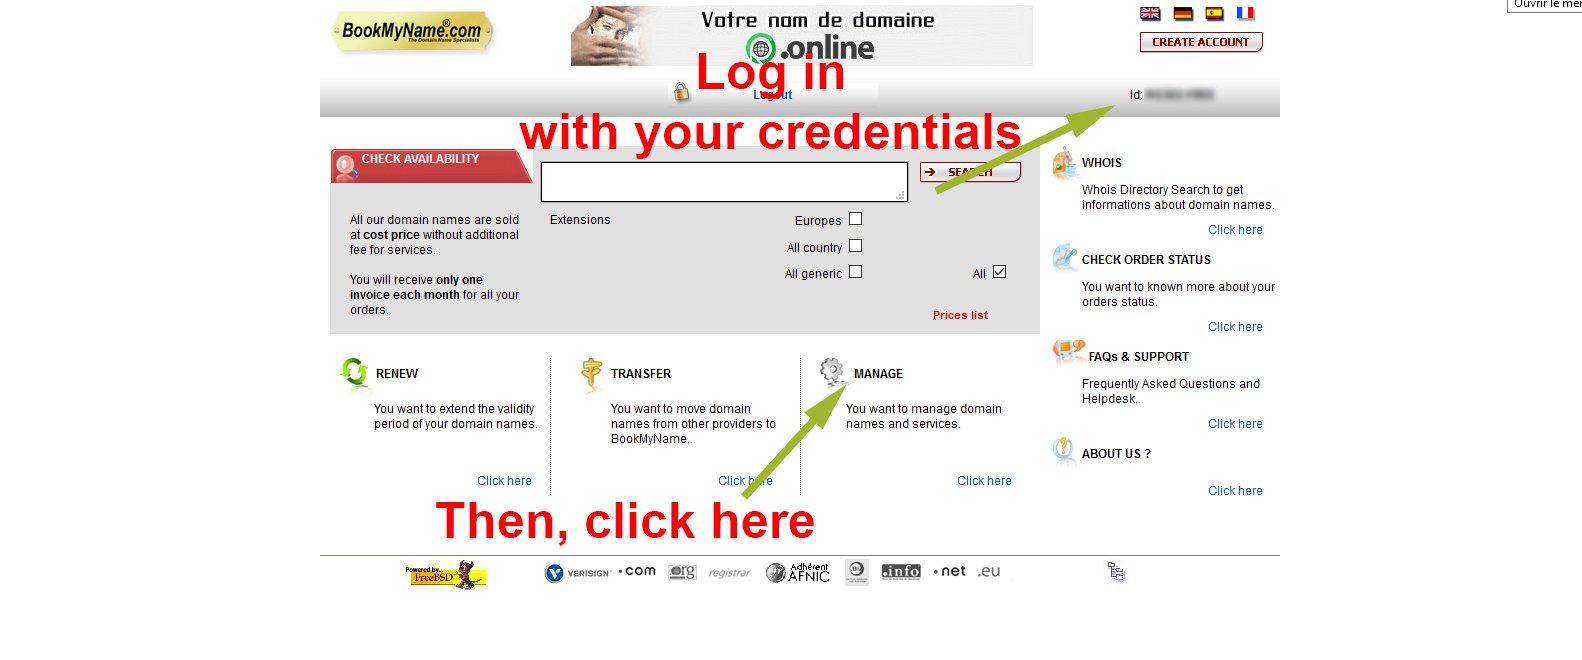
The procedure for changing the DNS at BookMyName is as follows.
Login to your BookMyName account :
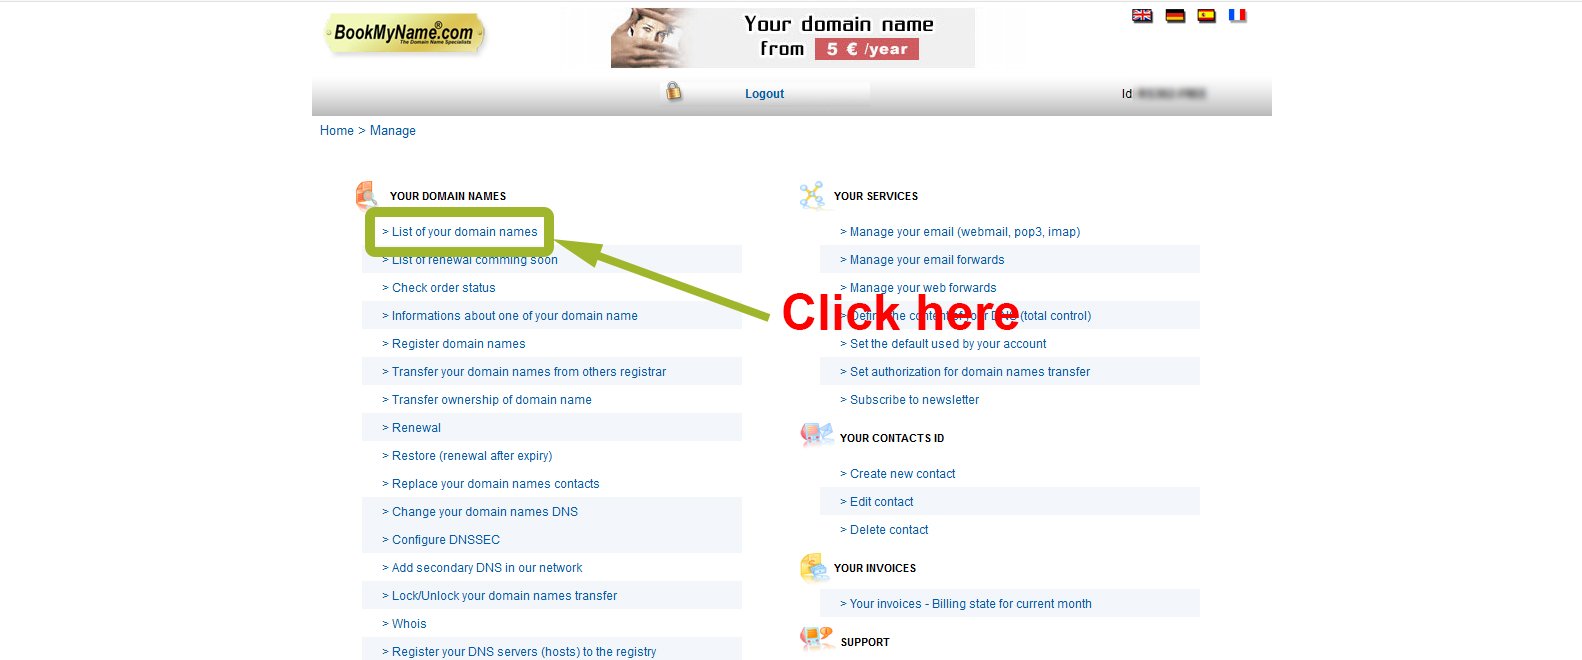
Click on "List of your domain names" :
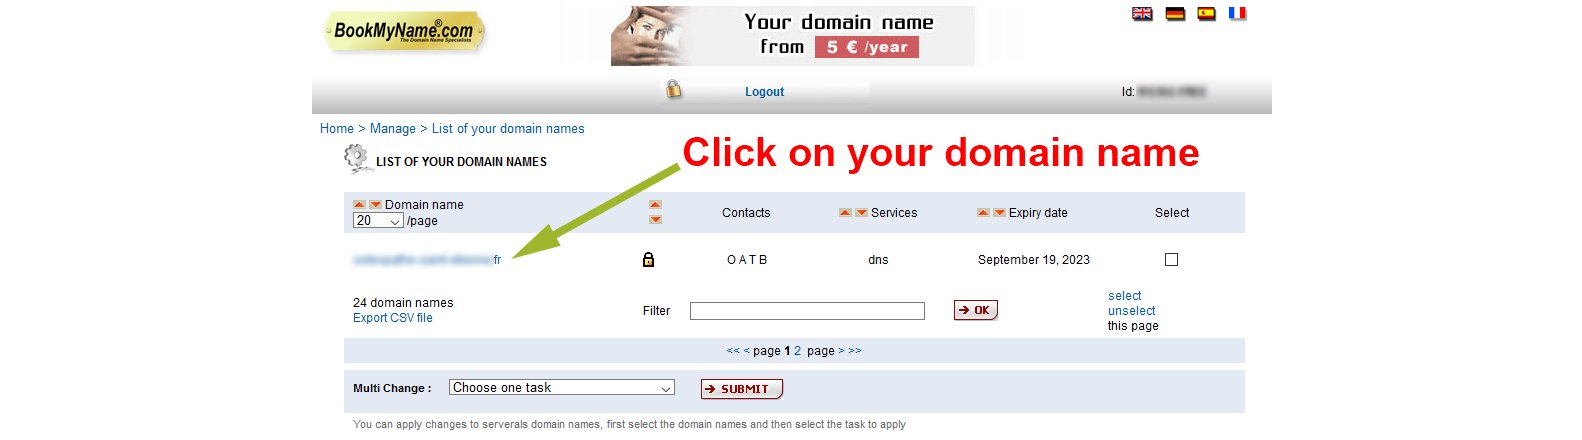
Choose the domain name in question :
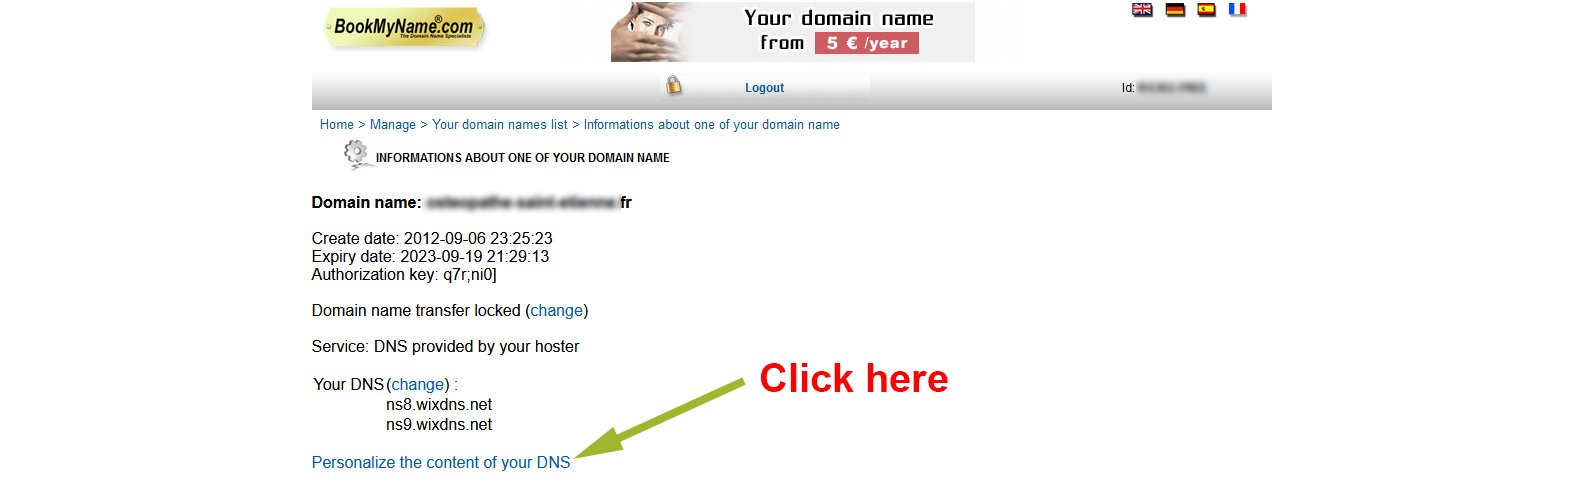
Click on "Customize the content of your DNS":
Then click on Advanced User Interface, enter the WWW and @ elements as shown in the capture below.
www 28800 A VOTREIP @ 28800 A VOTREIP
Either the IP of our server, or your dedicated IP address if you chose the option when you placed your order.

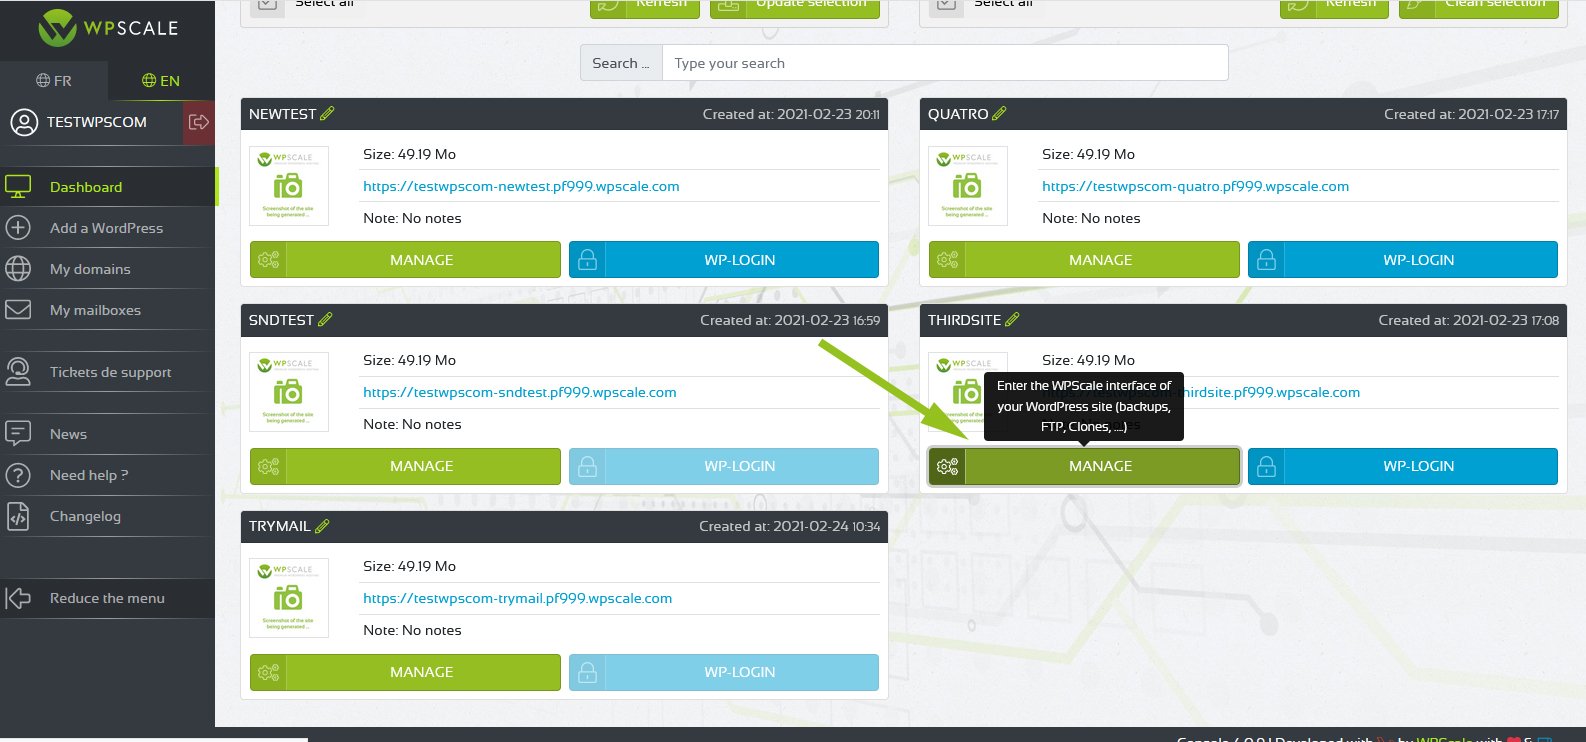
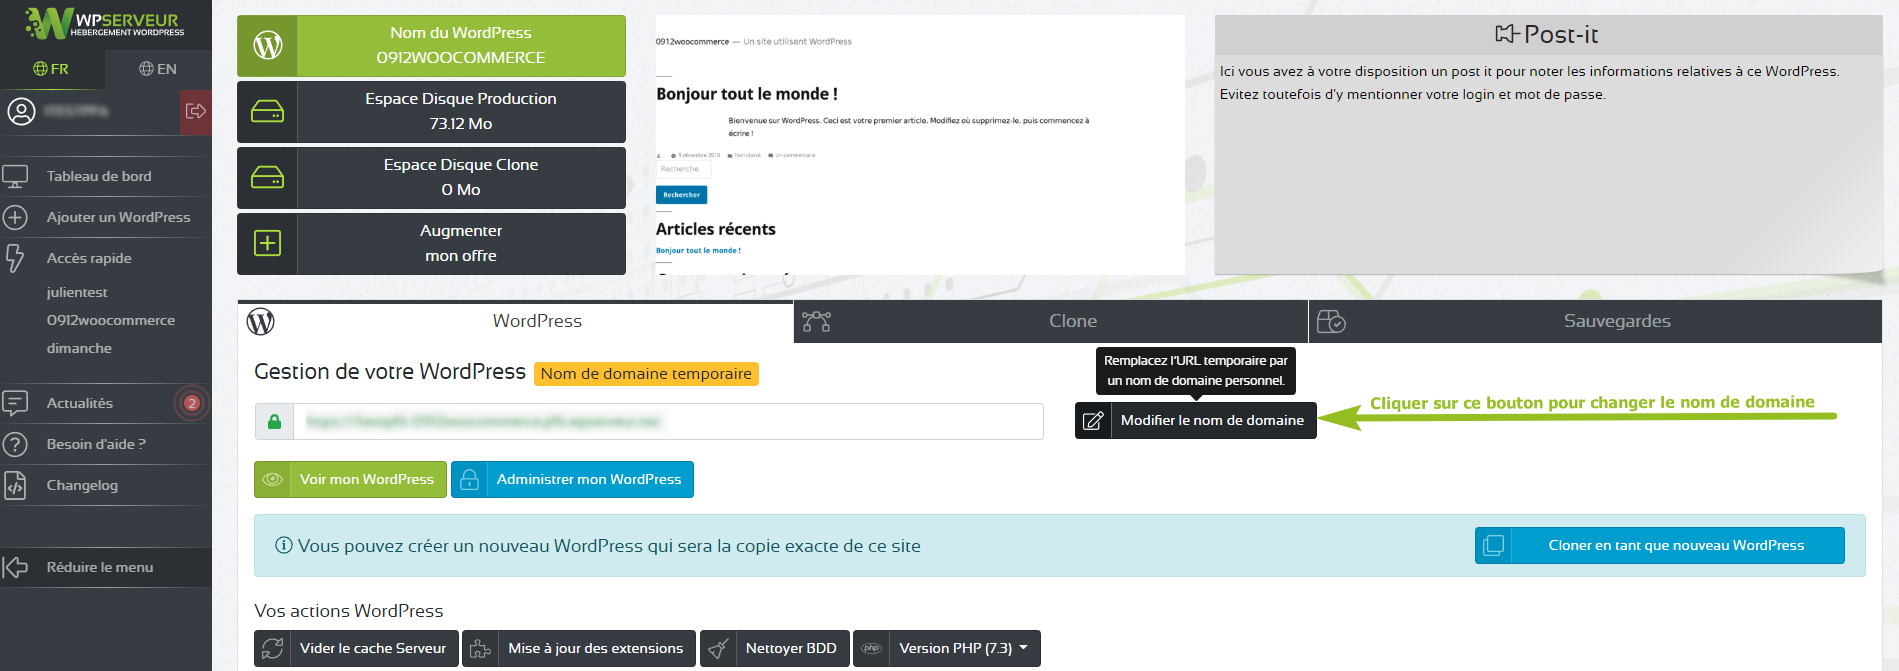
24 hours later, from your WPScale console, click the button to manage your WordPress, then click "Modify domain name" :
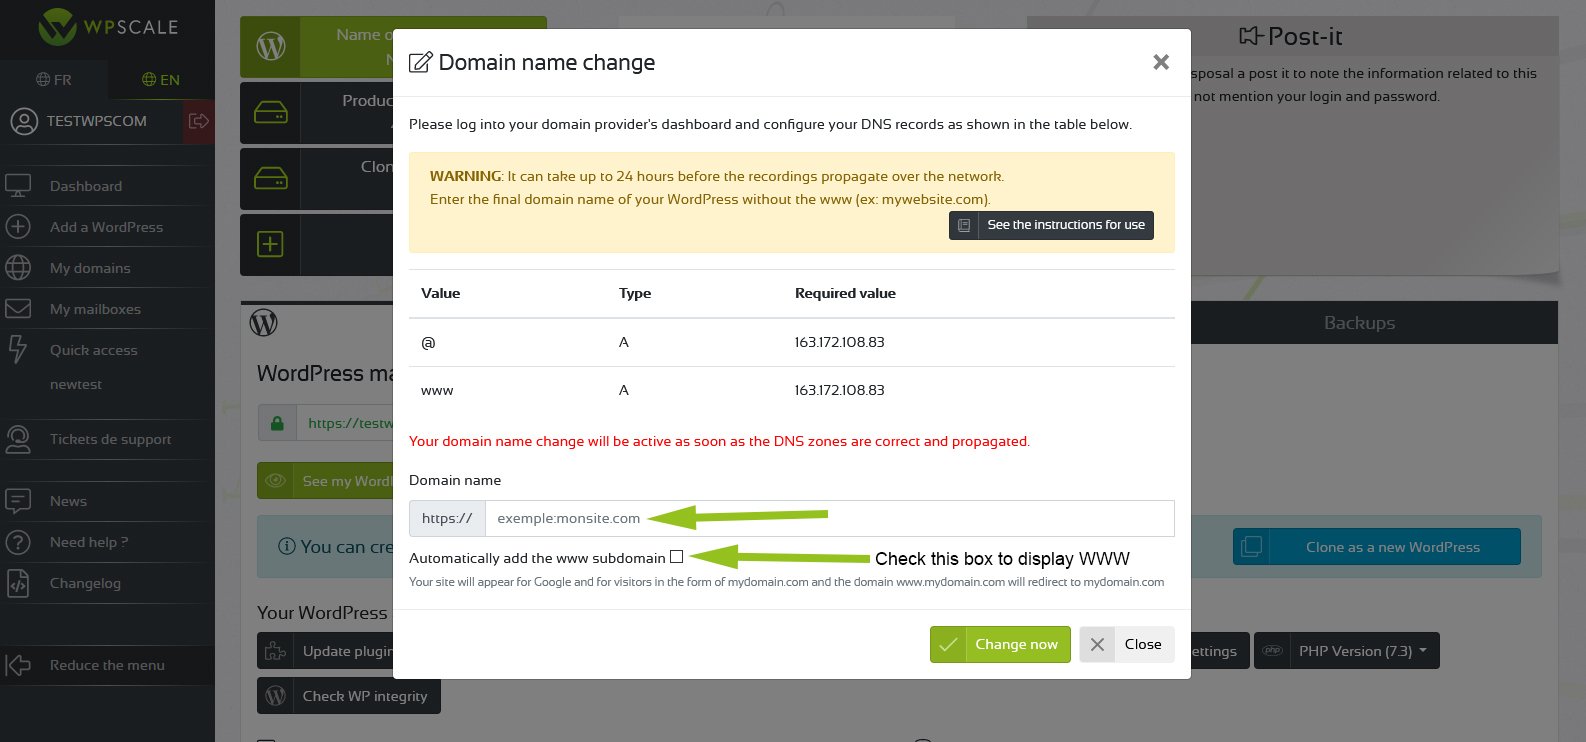
The DNS change window appears, and you just have to enter your domain name and validate :
OVH PROCEDURE
!!! WARNING!!! Do not take into account the IP mentioned for the example in the video tutorial.
Here below is the IP to which to point your Domain Name:
[display-ip-console]
Log in to your OVH account then click on the "Domain names" menu in "Web cloud" section, then choose the domain name concerned :
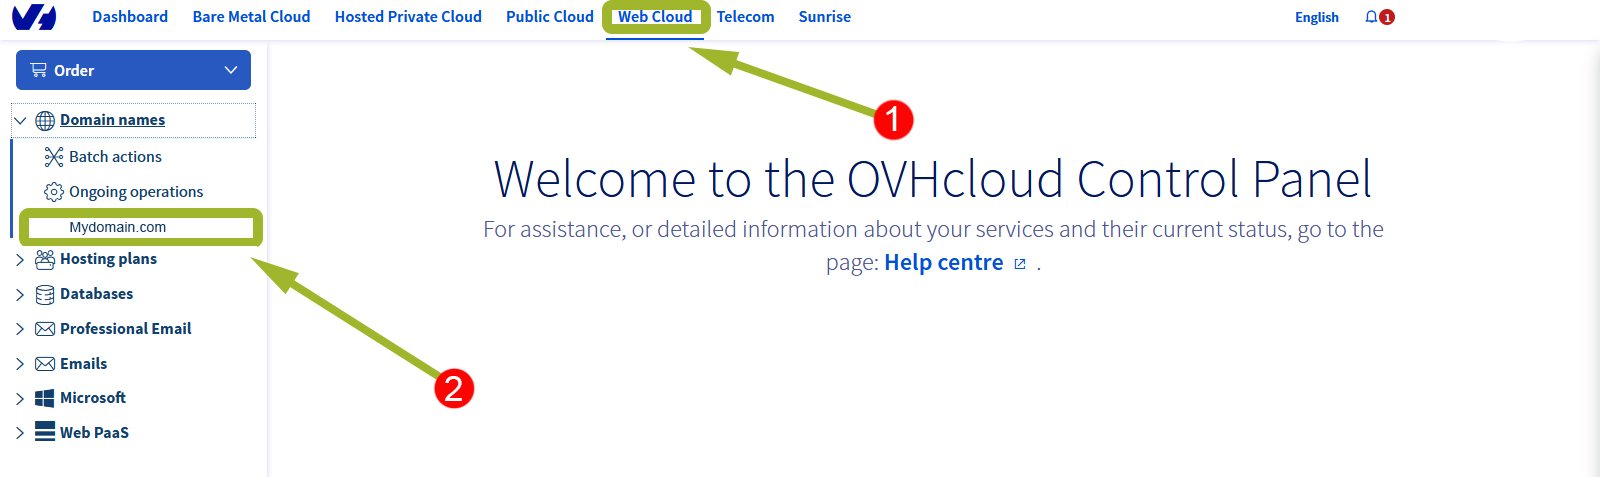
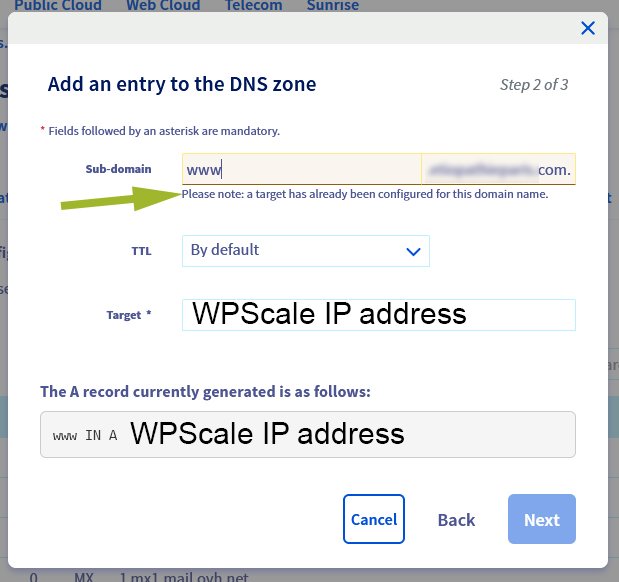
As shown in the image below, click on the "DNS Zone" tab (point 1 on the image). In this example, I have only displayed entry A (point 2 in the image). You have to configure the two entries A on @ and on www with the IP address of your server at WPScale linked to your domain name. Point 4 on the picture lets you modify the entry, and so change the IP address.
Warning: You must not have any CNAME entries linked to your domain on @ and www, and likewise for the AAAA entry (IPV6). If this is the case, you must delete these two entries.
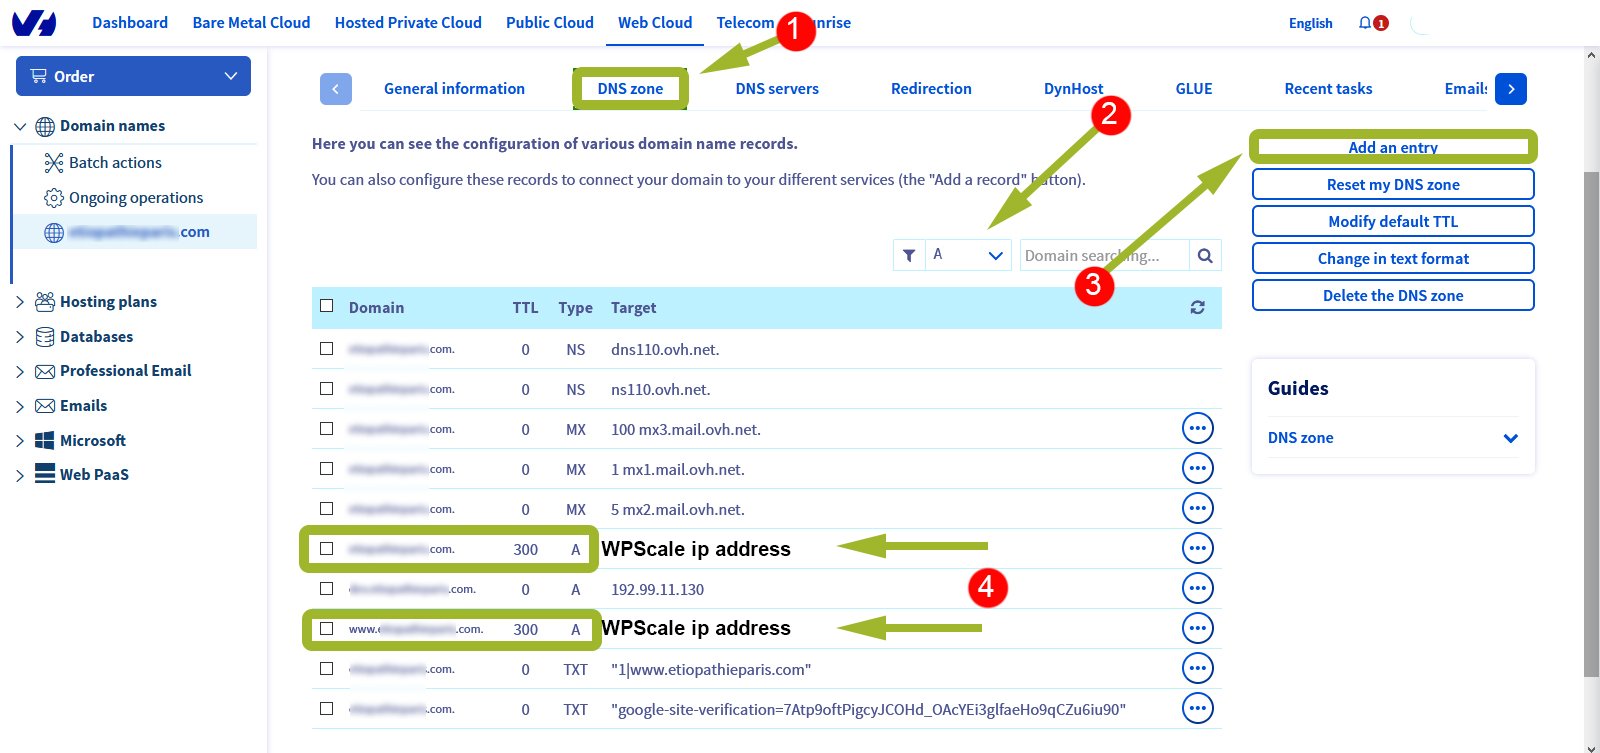
Item 3: If an A entry is missing (www, for example), click on the button "Add entry". If you get this warning and cannot add an entry, go back to the DNS zone and delete the appropriate entries (linked to the domain name), then add a DNS entry again and click on the blue "Next" button.
Warning : The modifications you’ve made on OVH aren’t effective immediately (DNS propagation time). In principle, it can take 24 hours - it depends on the TTL setting that was configured by default on your OVH account. If it shows 0 or 3600 seconds, then it will take at least 1 hour before you can add your domain name in your WPScale console
Once propagation is complete, from your WPScale console, click the button to manage your WordPress, then click on "Edit domain name" :
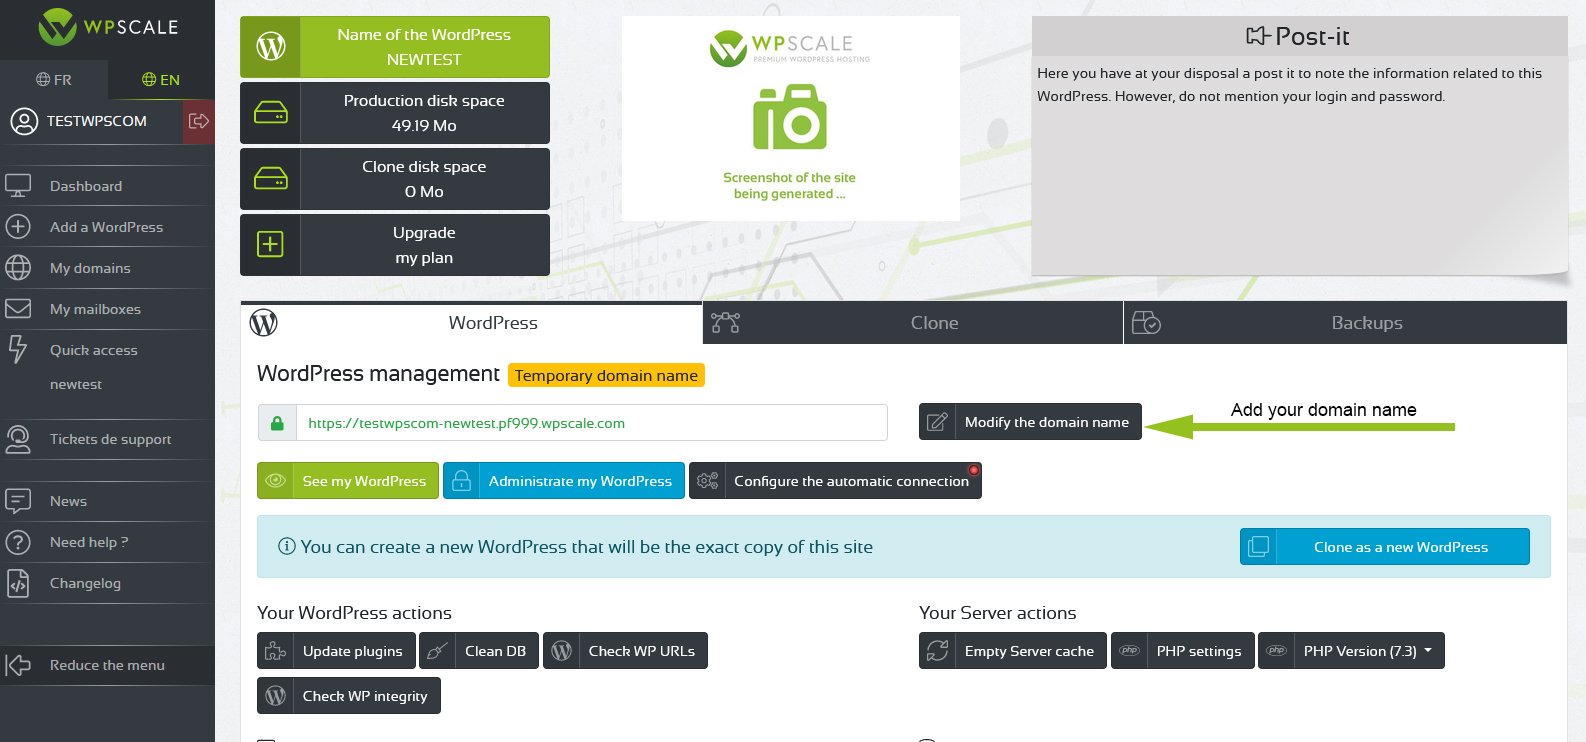
The DNS change window appears, and you just have to enter your domain name and validate :
GANDI PROCEDURE
!!! WARNING!!! Do not take into account the IP mentioned for the example in the video tutorial.
Here below is the IP to which to point your Domain Name :
[display-ip-console]
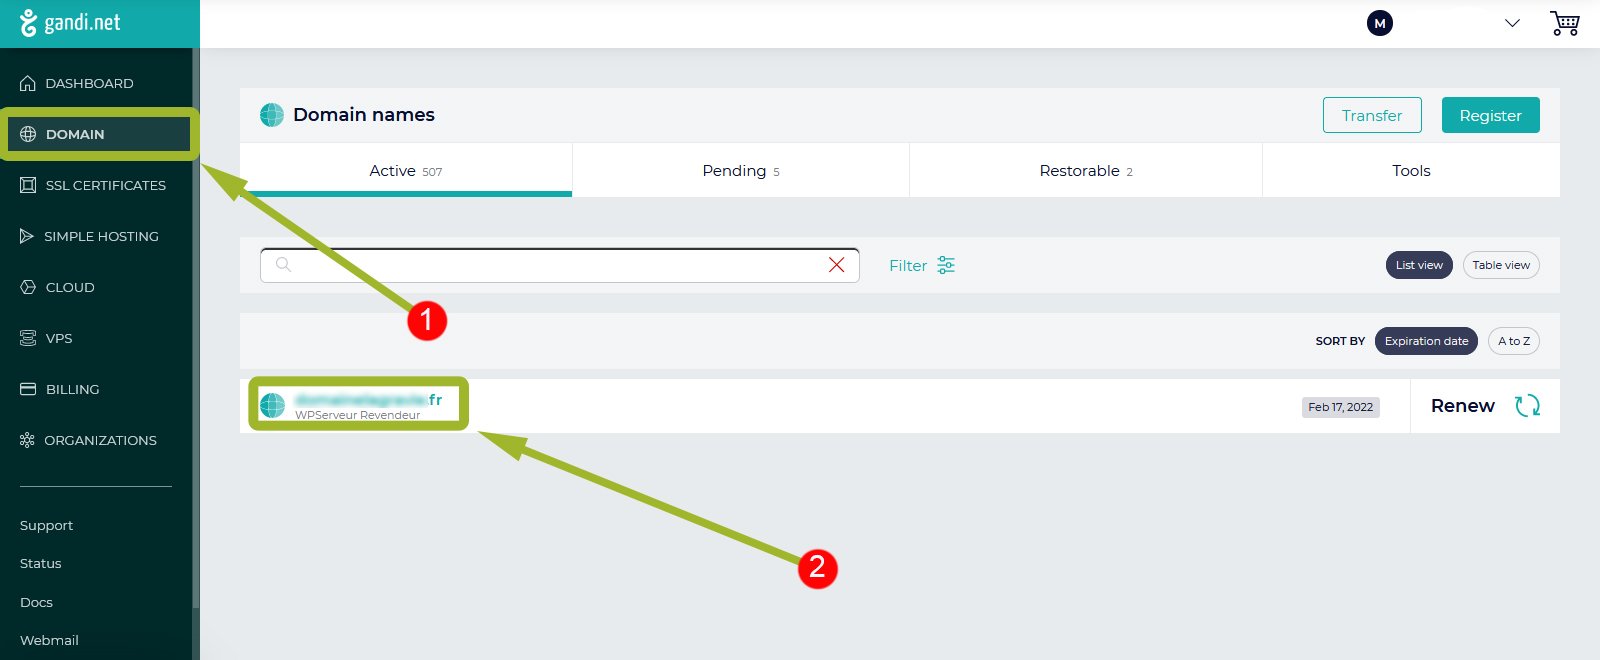
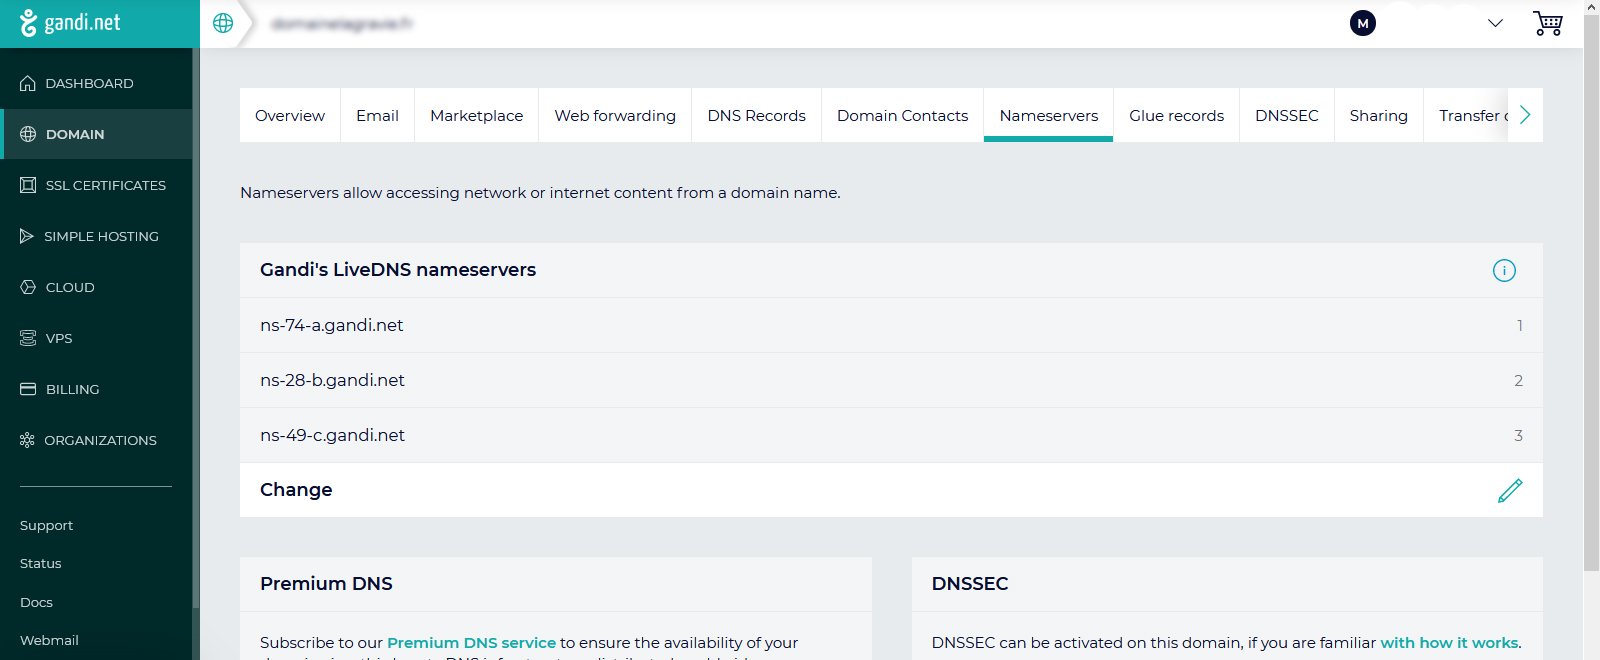
Login to your Gandi account then click on the "Domain name" menu, then choose the domain name in question:
Before configuring your DNS zones from the "DNS registration" tab, click on the "Name servers" tab and then check that Gandi LiveDNS mode is activated.
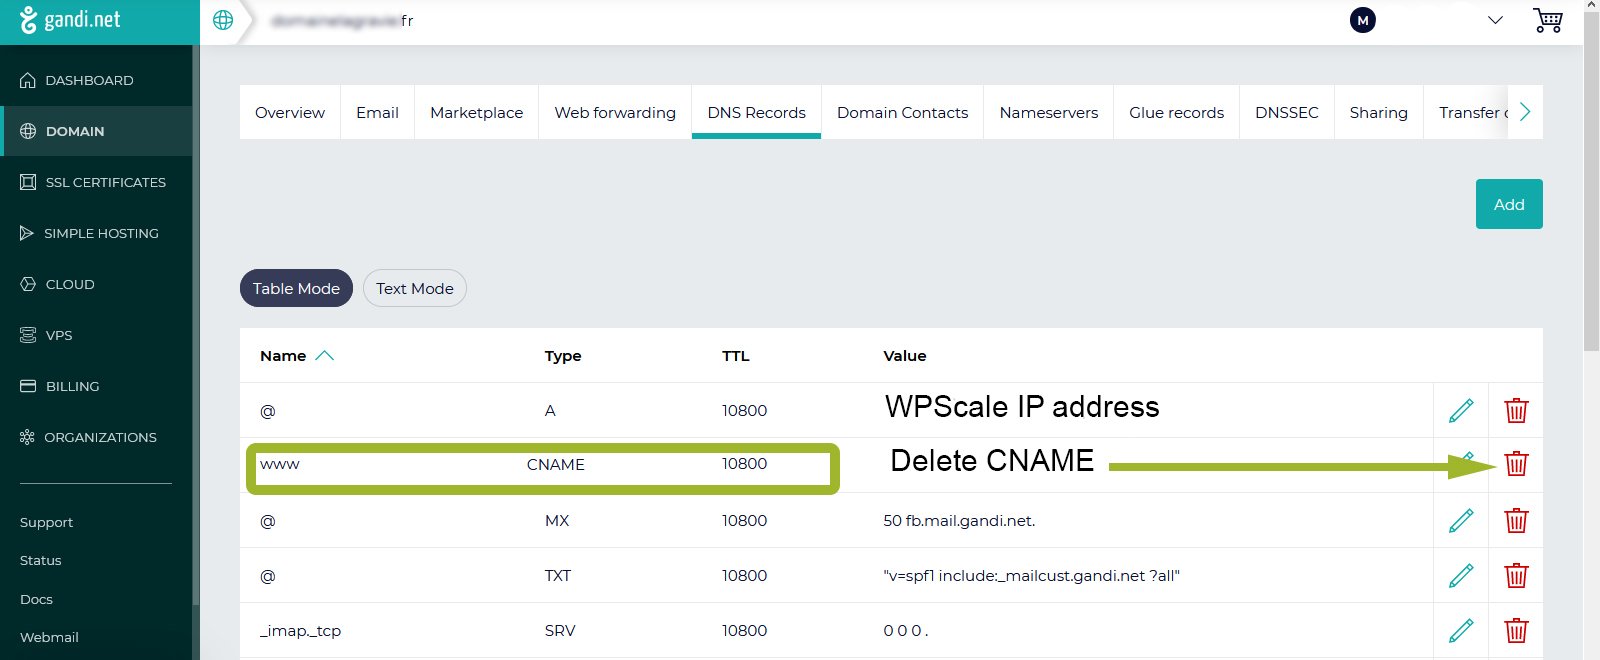
Click on the "DNS records" tab. To be able to add your domain to your WPScale console, you must configure the two A entries on @ and on www with the IP address of your server at WPScale. As shown in the example below, you should not have any CNAME entries linked to your domain on @ and www, and the same goes for the AAAA (IPV6) entry. If this is the case, you should delete these two entries.
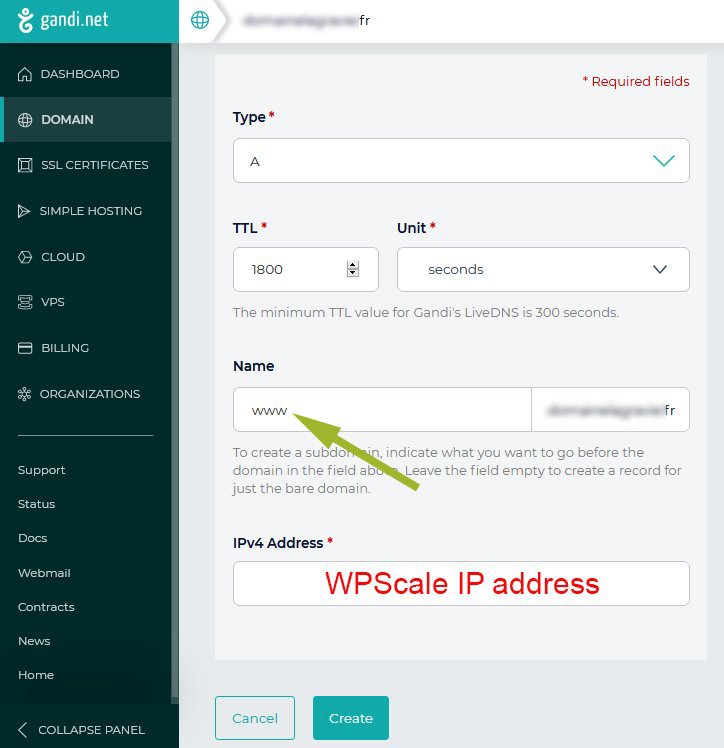
In this example, the A entry is missing on the www linked to your domain name. To add an A entry, click on the green "Add" button. To change the IP address of an entry, simply click on the small pencil (edit).
Indicate the IP address of your server at WPScale with www with TTL over 300 seconds, then click on the green "Add" button.
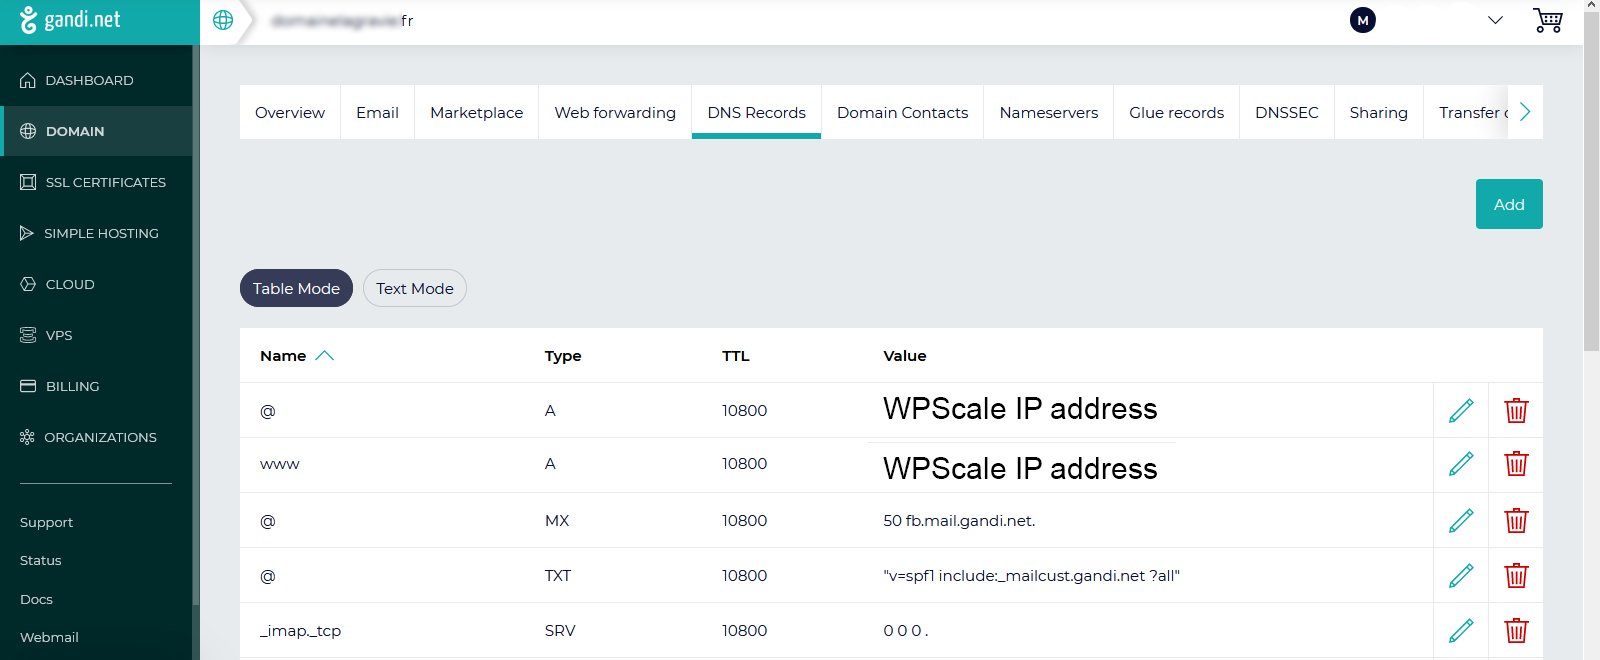
Now the DNS configuration is complete, you should have an A entry with @ and another A entry with WWW.
Warning: The modifications you’ve made on Gandi are not effective immediately (DNS propagation time). In principle, this can take 24 hours, depending on the TTL setting that’s been configured by default on your Gandi account. If it shows 10800 seconds, then it will take a minimum of 3 hours before you can add your domain name to your WPScale console.
Once propagation is complete, from your WPScale console, click the button to manage your WordPress, then on "Modify domain name" :
The DNS change window appears, and you just have to enter your domain name and validate :
GOOGLE DOMAINS PROCEDURE
(Pour visualiser votre IP, vous devez être connecté)
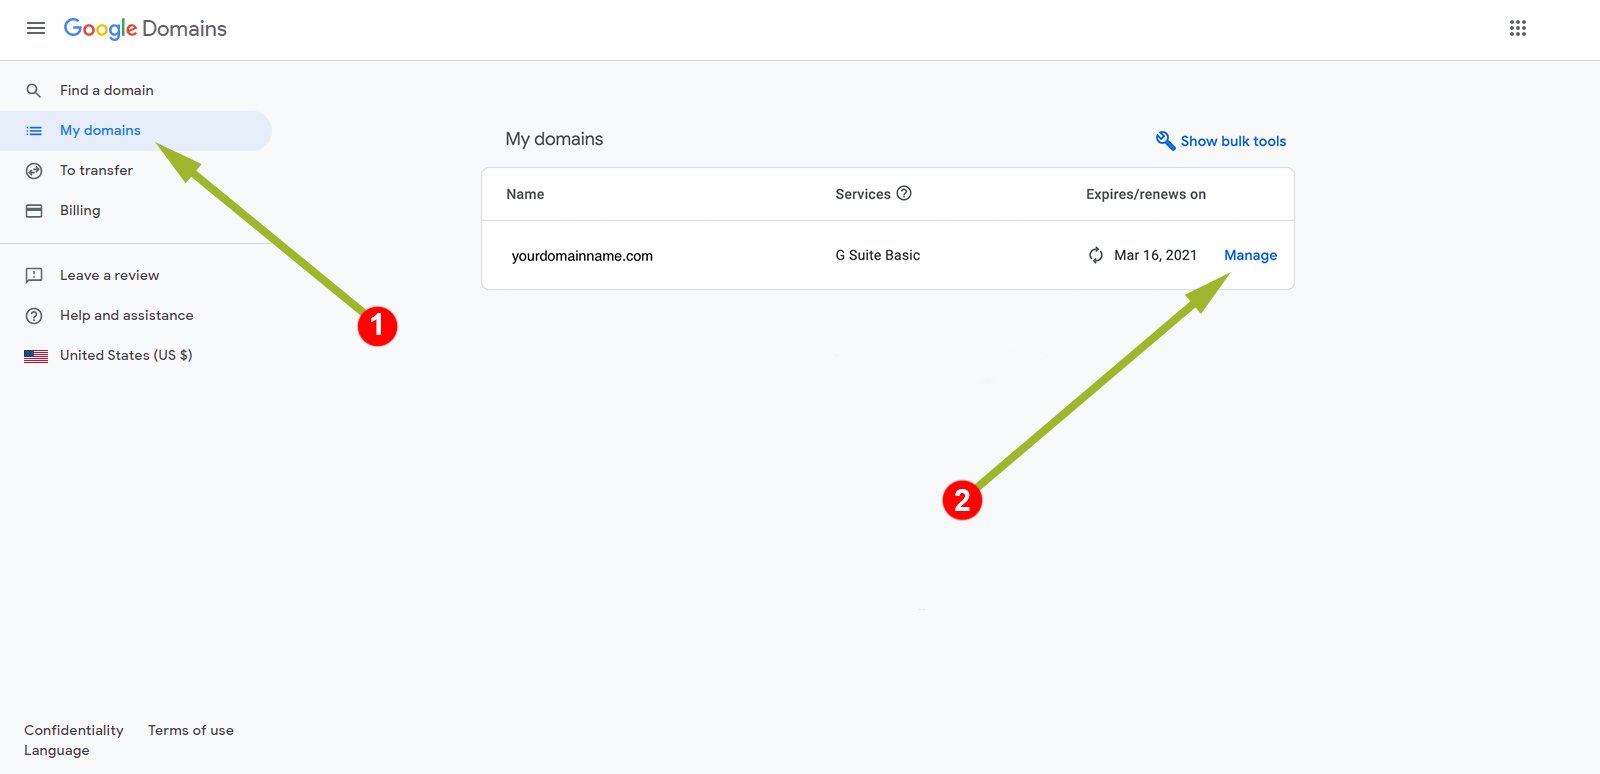
Sign in to your Google Domains account (gmail account) then click on the blue "My domains" button and sign in to your gmail account.
Once logged in, choose the domain and click on it :
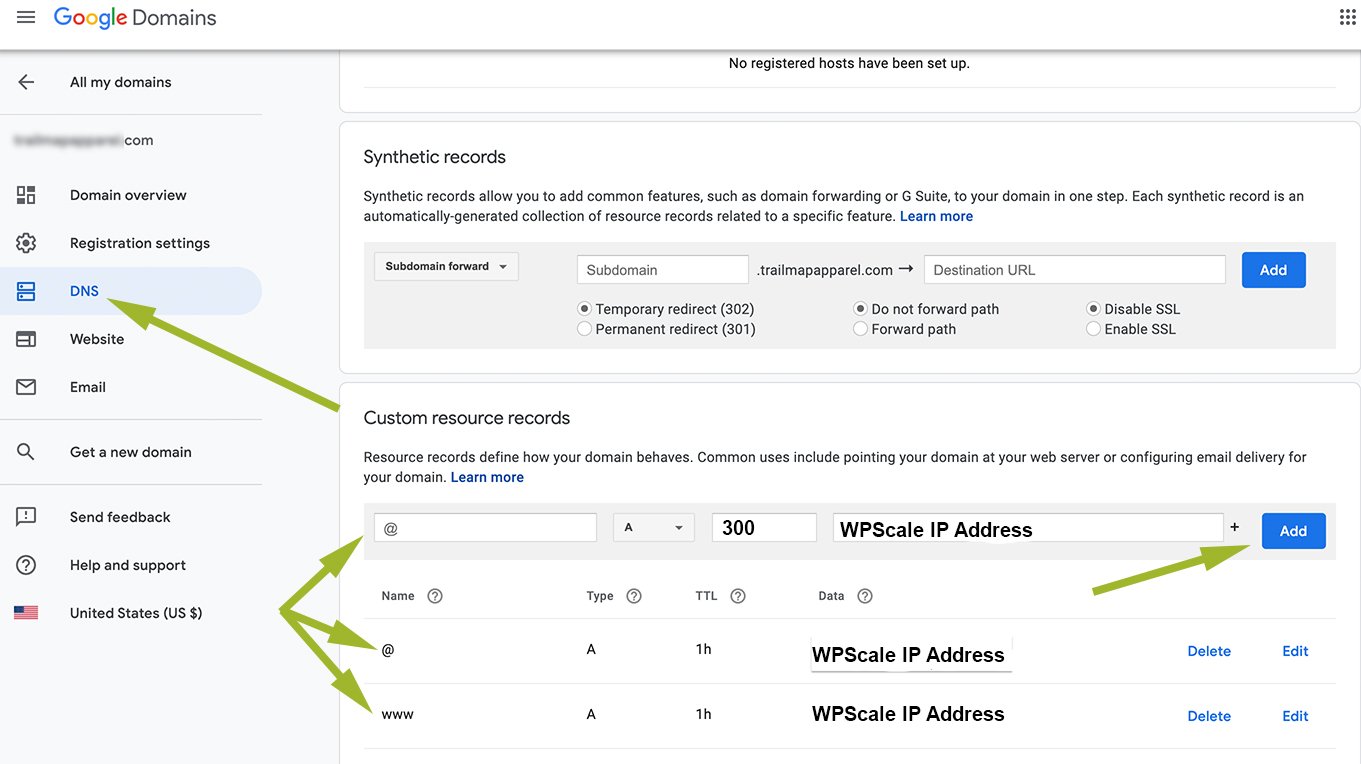
On the "DNS" menu (point 1), in the "Synthetic registrations" box, then on the drop-down menu (point 2), check you have nothing specified, and if so, delete everything (point 3).
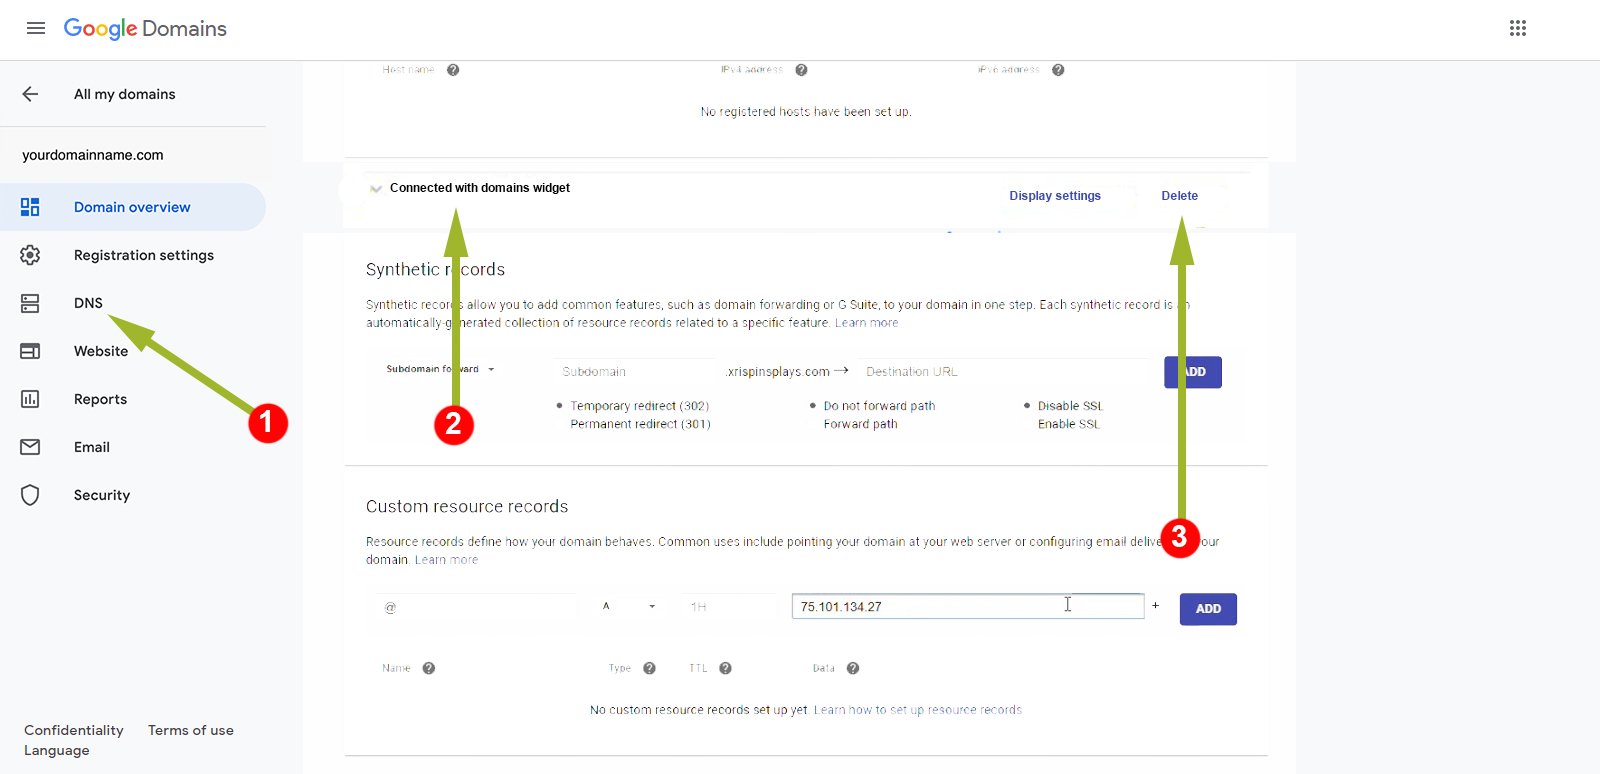
In the "Custom resource records" box, add an @ and www entry with a TTL of 300 and add the WPScale IP address or dedicated IP address if you ordered one.
Warning : The changes you’ve made on Google Domains are not effective immediately (DNS propagation time). In principle, it can take 24 hours, depending on the TTL setting that was configured by default on your Google Domains account. If it shows 10800 seconds, then you’ll have to wait at least 3 hours before you can add your domain name in your WPScale console.
Once propagation is complete, from your WPScale console, click the button to manage your WordPress, then on "Modify domain name":
The change DNS window appears, and you just have to enter your domain name and validate :
Ionos (1&1) PROCEDURE
!!! WARNING!!! Do not take into account the IP mentioned for the example in the video tutorial.
Here below is the IP to which to point your Domain Name:
[display-ip-console]
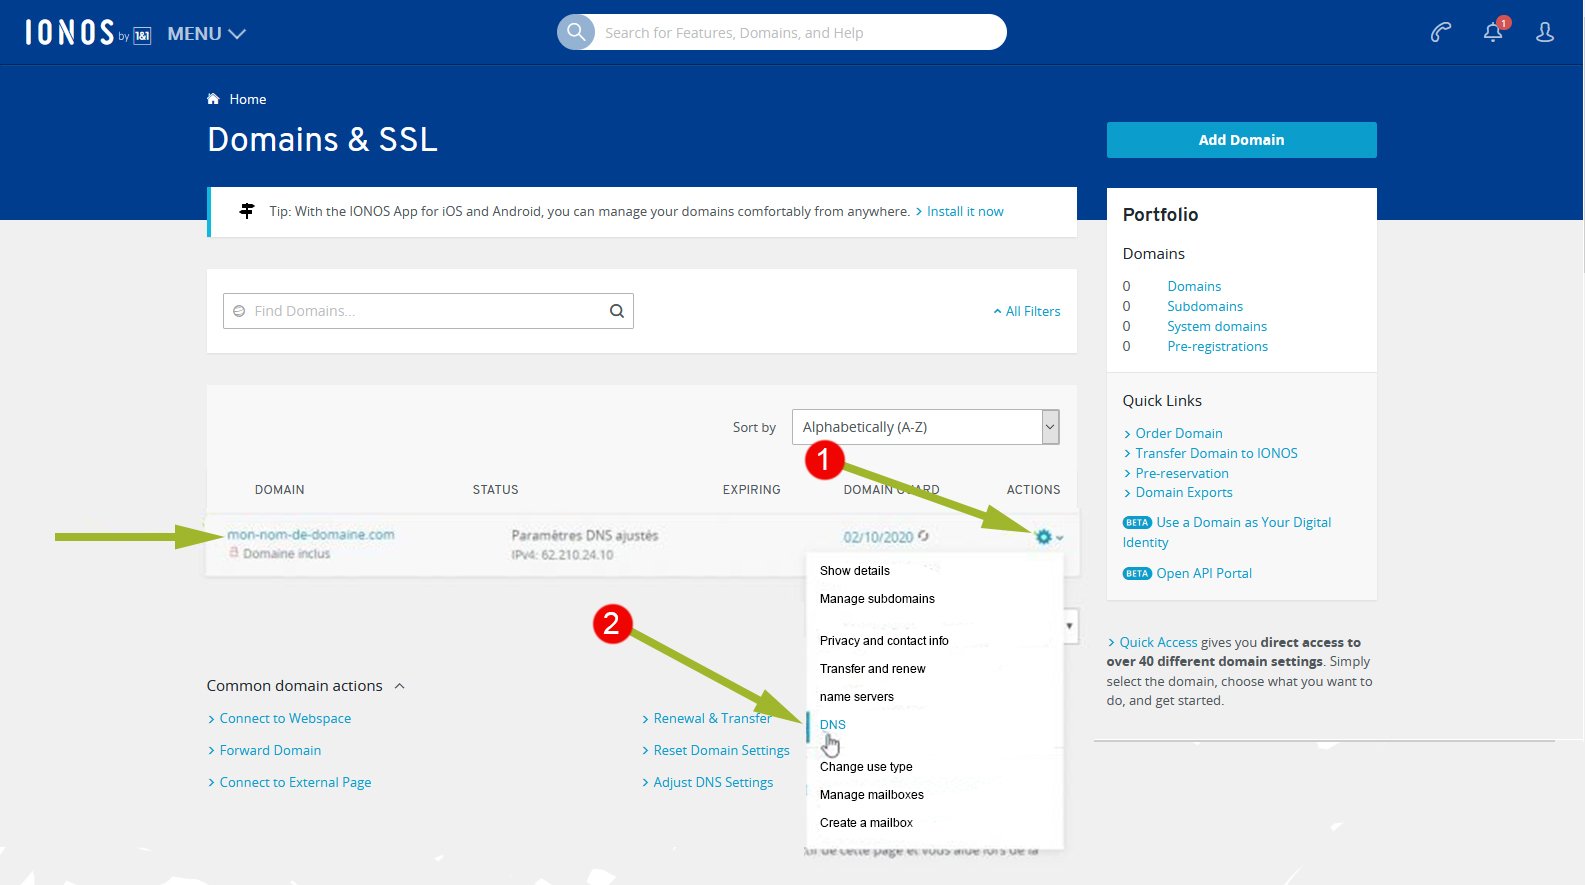
Log in to your ionos account then choose the product "Domains & SSL" :

Choose the domain name in question, click the cogwheel and then click on "DNS" :
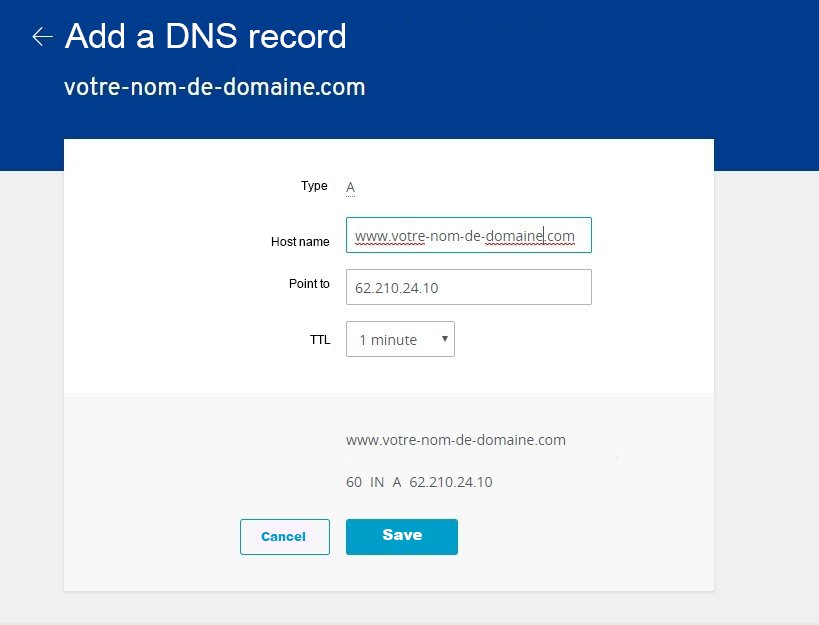
You’ll be redirected to this DNS zone management interface. You have to configure the two entries A on @ and on www with the IP address of your server at WPScale (value field). Attention, in order for the addition of your domain name in the WPScale console to work, you must not have CNAME entries linked to your domain on @ and www, and likewise for the AAAA entry (IPV6). If this is the case, you must delete these two entries
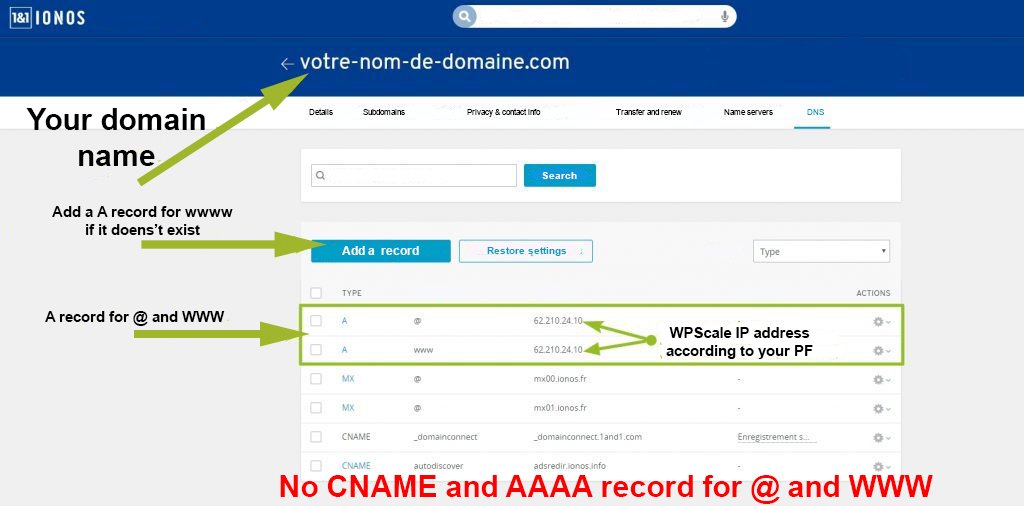
If an entry is missing, e.g. entry A on the www, click on the blue "Add record" button, then enter the domain name and IP address of WPScale and click on the blue "Register" button.
Warning: The modifications you’ve made on IONOS are not effective immediately (DNS propagation time). In principle, it can take 24 hours, depending on the TTL setting that’s configured at ionos. If it shows 1 hour, then you’ll have to wait at least 1 hour before you can add your domain name in your WPScale console.
Once propagation is complete, from your WPScale console, click the button to manage your WordPress, then click on "Edit domain name"
The change DNS window appears, and you just have to enter your domain name and validate :
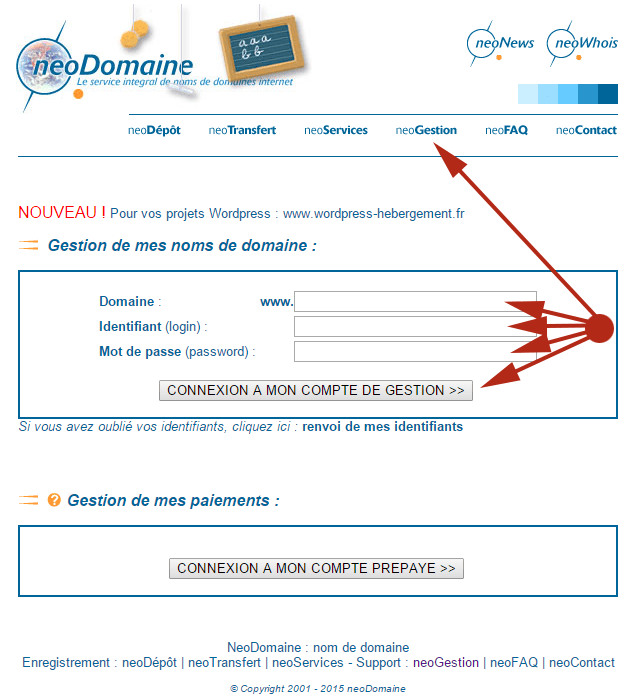
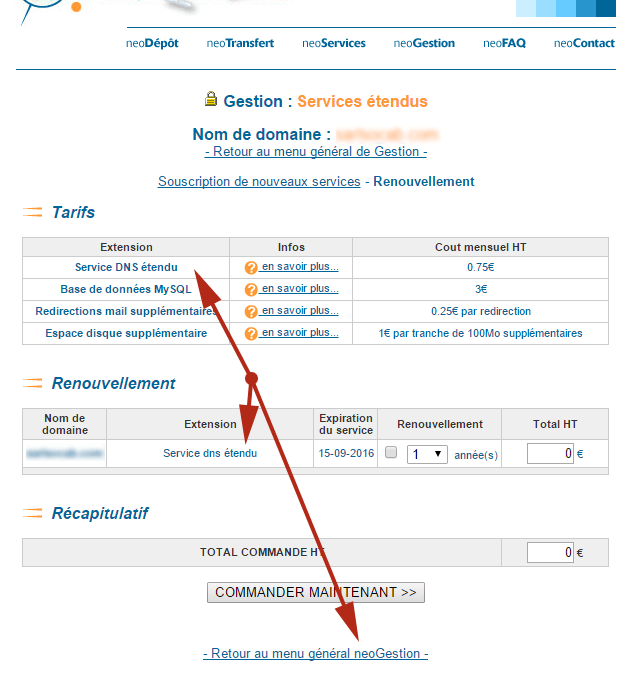
NEODOMAINE PROCEDURE
!!! WARNING!!! Do not take into account the IP mentioned for the example in the video tutorial.
Here below is the IP to which to point your Domain Name:
[display-ip-console]
The procedure for changing DNS at NeoDomain is as follows :
You must first log in to your NeoDomain account, by first clicking on NeoGestion:
Then click on the "Extended services" link:
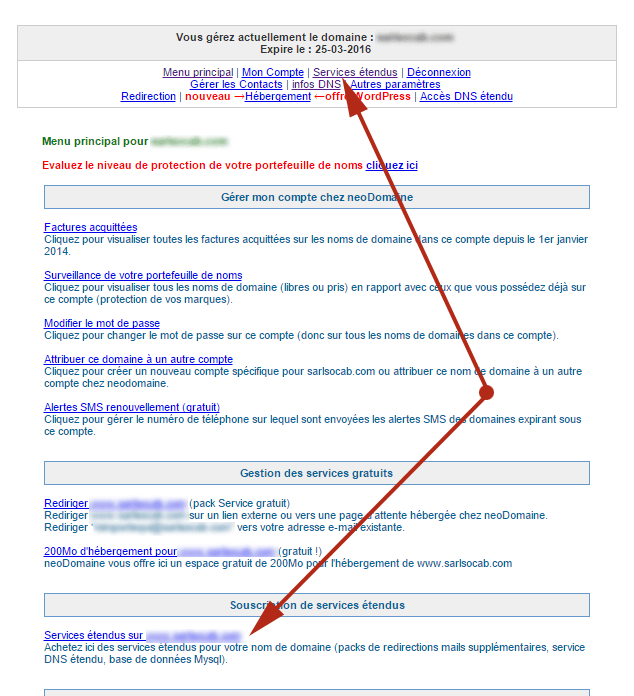
Please note that you need to order the "Extended DNS service", as it’s not free of charge.
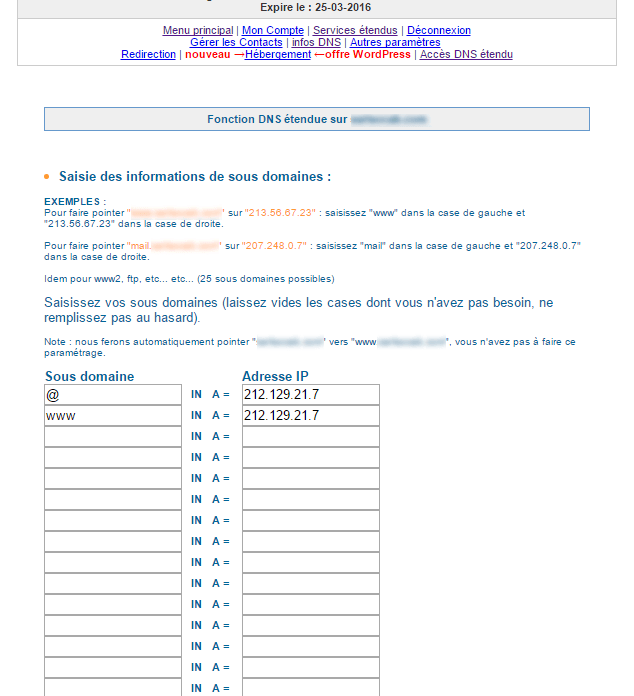
Once this is done, click to go back to the general Management menu, then click on the "Extended DNS access" link.

You then arrive on a page as below. Enter the same values and click on the button at the very bottom to validate. Warning: you have to remove the CNAME record present.
24 hours later, from your WPScale console, click the button to manage your WordPress, then click on "Modify domain name":
The change DNS window appears, and you just have to enter your domain name and validate:
PLANETHOSTER PROCEDURE
!!! WARNING!!! Do not take into account the IP mentioned for the example in the video tutorial.
Here below is the IP to which to point your Domain Name:
[display-ip-console]
The procedure for changing DNS at PlanetHoster is as follows:
You must first log in to your PlanetHoster account via this link: Login.
Then click on "My Services" and "My Domains" in the drop-down menu.
Then you need to search for your domain name and click on the "Manage" button on the right.
To be able to edit the DNS zone and modify the registrations to point your domain name to our servers, you need to click on the green button to activate the DNS zone.
You’ll then have access to DNS management as below:
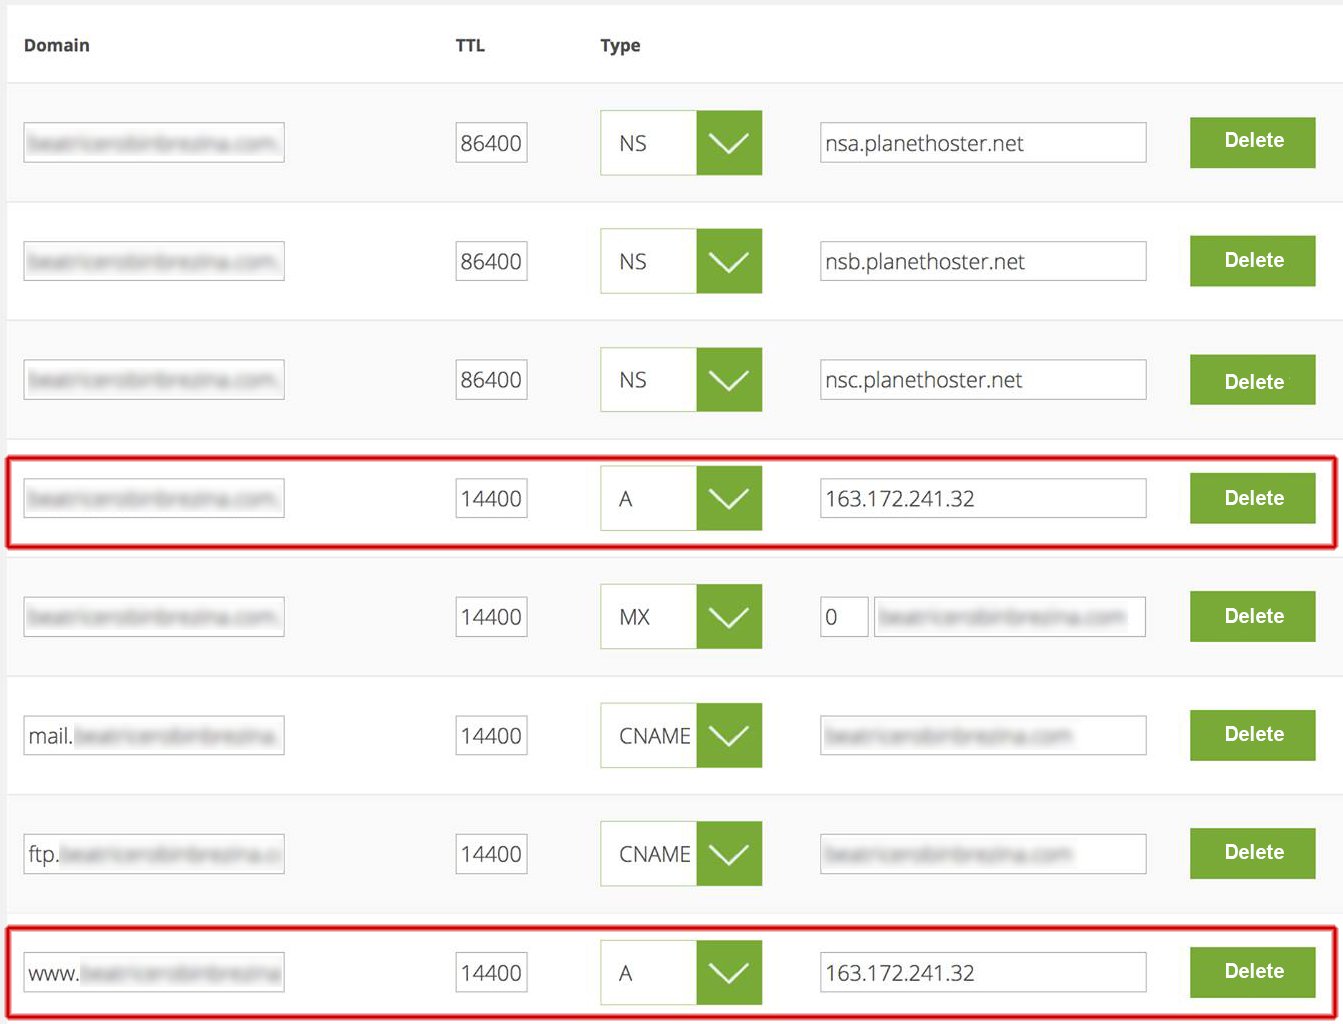
The two parts surrounded by the red frame are the two important parts, so you need to have the next two records:
- yourdomain.com => record type : A => IP address of the server you’re on.
- www.yourdomain.com => record type : A => IP address of the server you’re on.
If a record already exists and you modify it, you must then click on the blue button on the right to update it.
If, on the other hand, one of the records does not exist, you have to create it using the form below:

Once validated, you just have to wait until everything is taken into account :)
A few hours later (24 maximum), from your WPScale console, click the button to manage your WordPress, then click on "Modify domain name":
The change DNS window appears, and you just have to enter your domain name and validate:
GODADDY PROCEDURE
!!! WARNING!!! Do not take into account the IP mentioned for the example in the video tutorial.
Here below is the IP to which to point your Domain Name:
[display-ip-console]
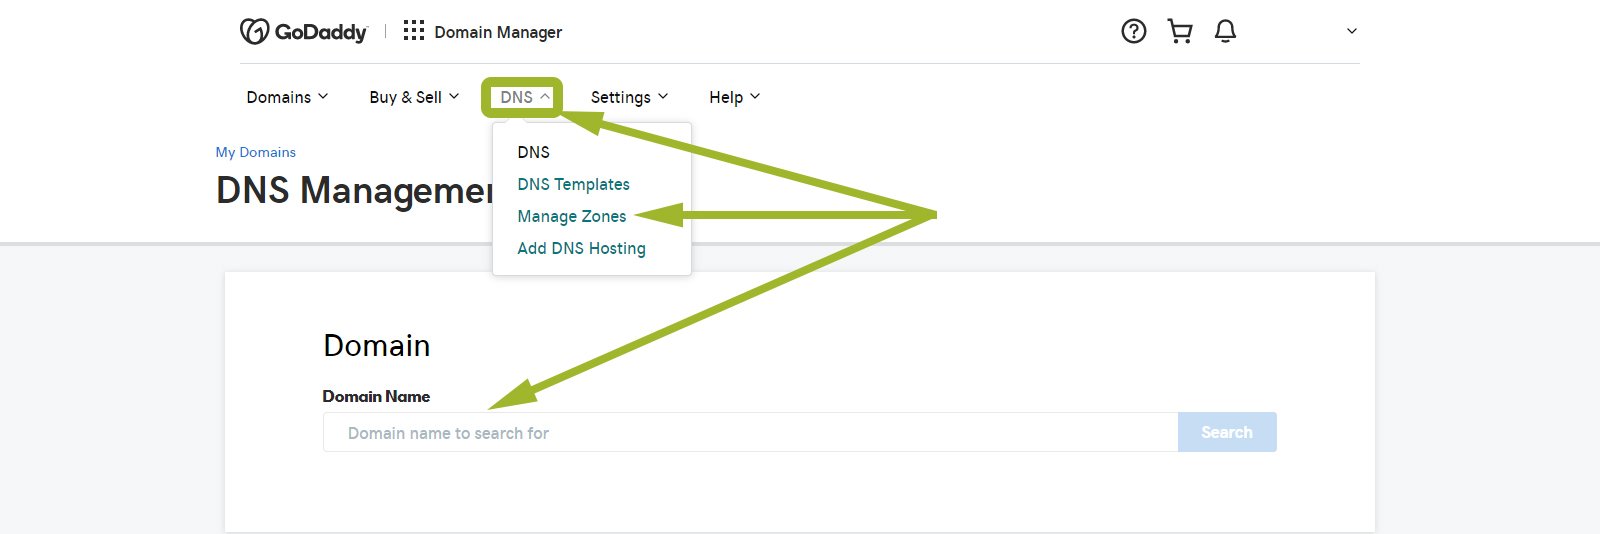
The procedure for changing DNS at GoDaddy is as follows:
You must first login to your GoDaddy account via this link : Login.
Then click on "DNS" and "Manage zones" in the main menu.
Then you have to enter your domain name in the search field and click on the "Search" button on the right.
Make sure that the dns zone is the default. If the name server isn’t managed by GoDaddy, a message will appear to let you know. If this is the case, return to the default configuration so that your TYPE A entries are taken into account.
You’ll then have access to DNS management as below:
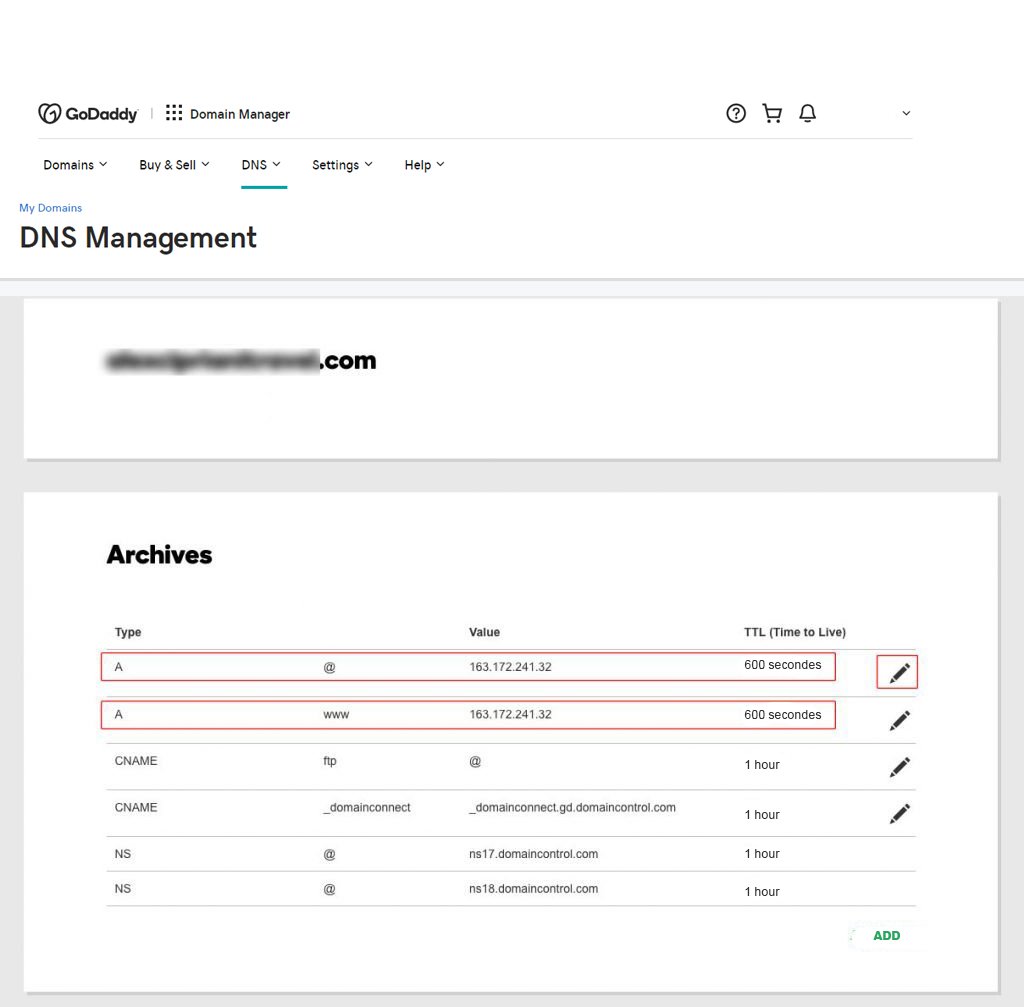
The two parts surrounded by the red frame are the two important parts, so you need to have the next two records:
- @ => record type : A => IP address of the server you’re on.
- www. => record type : A => IP address of the server you’re on.
If one of the records doesn’t exist, you have to create it via the form that appears below after clicking on ADD:
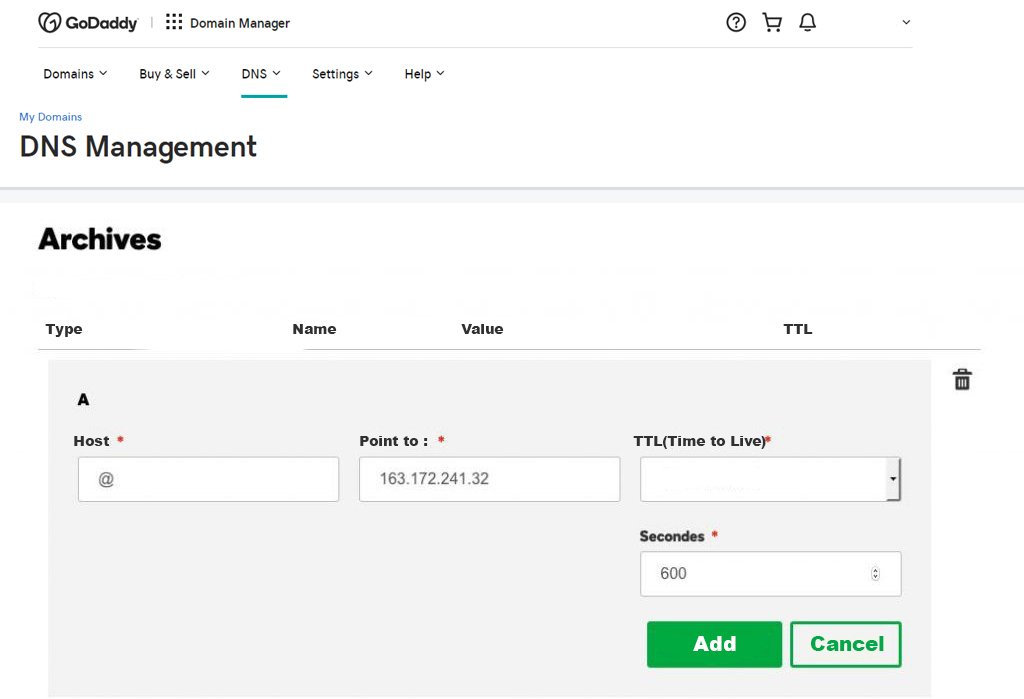
Save the newly created zone.
Once validated, you just have to wait until everything is taken into account :)
A few hours later (24 maximum), from your WPScale console, click the button to manage your WordPress, then click on "Modify domain name":
The change DNS window appears, and you just have to enter your domain name and validate :
LWS PROCEDURE
!!! WARNING!!! Do not take into account the IP mentioned for the example in the tutorial.
Here below is the IP to which to point your Domain Name:
[display-ip-console]
The procedure for changing DNS at LWS is as follows:
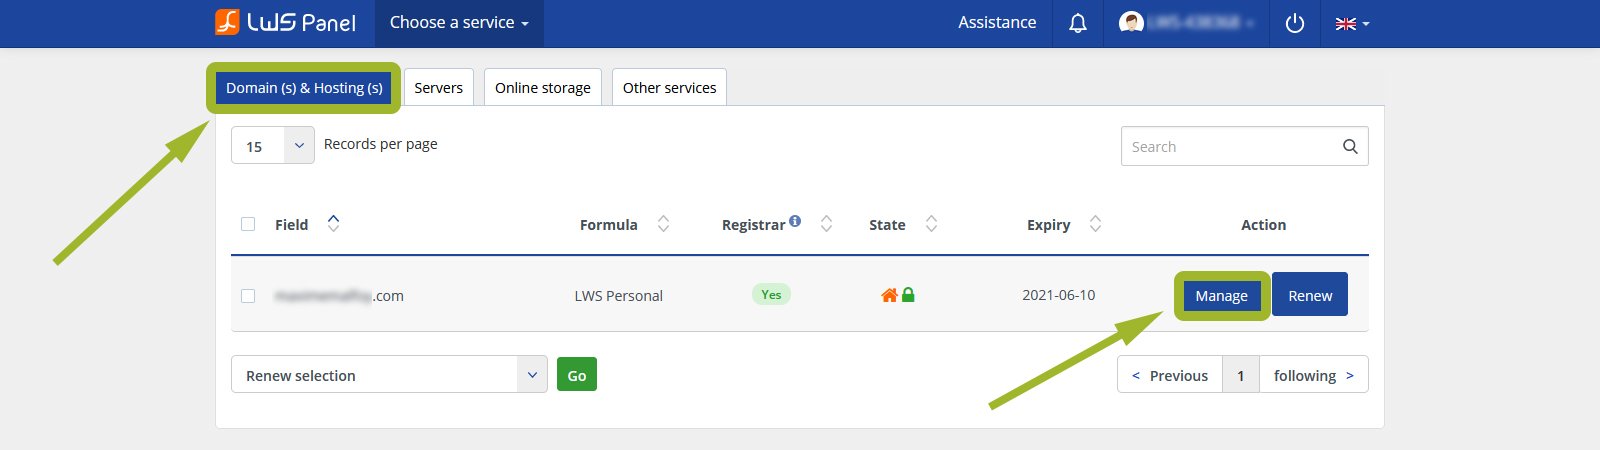
You must first log in to your LWS account via this link: Login.
Then, in "Domains and hosting" section, select your domain name and click on the "Manage" button:
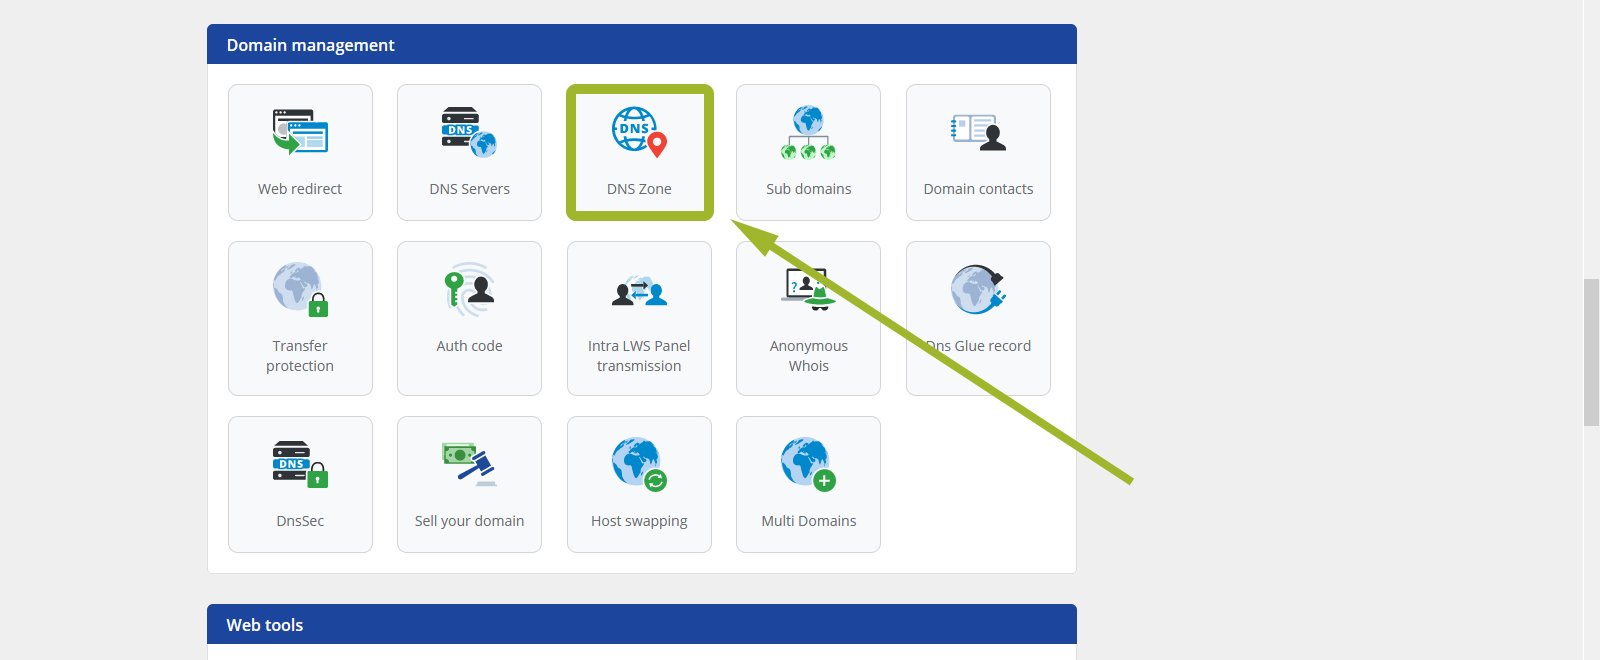
Then, into your dashboard, click on the "DNS Zone" button in the "Domain management" section.
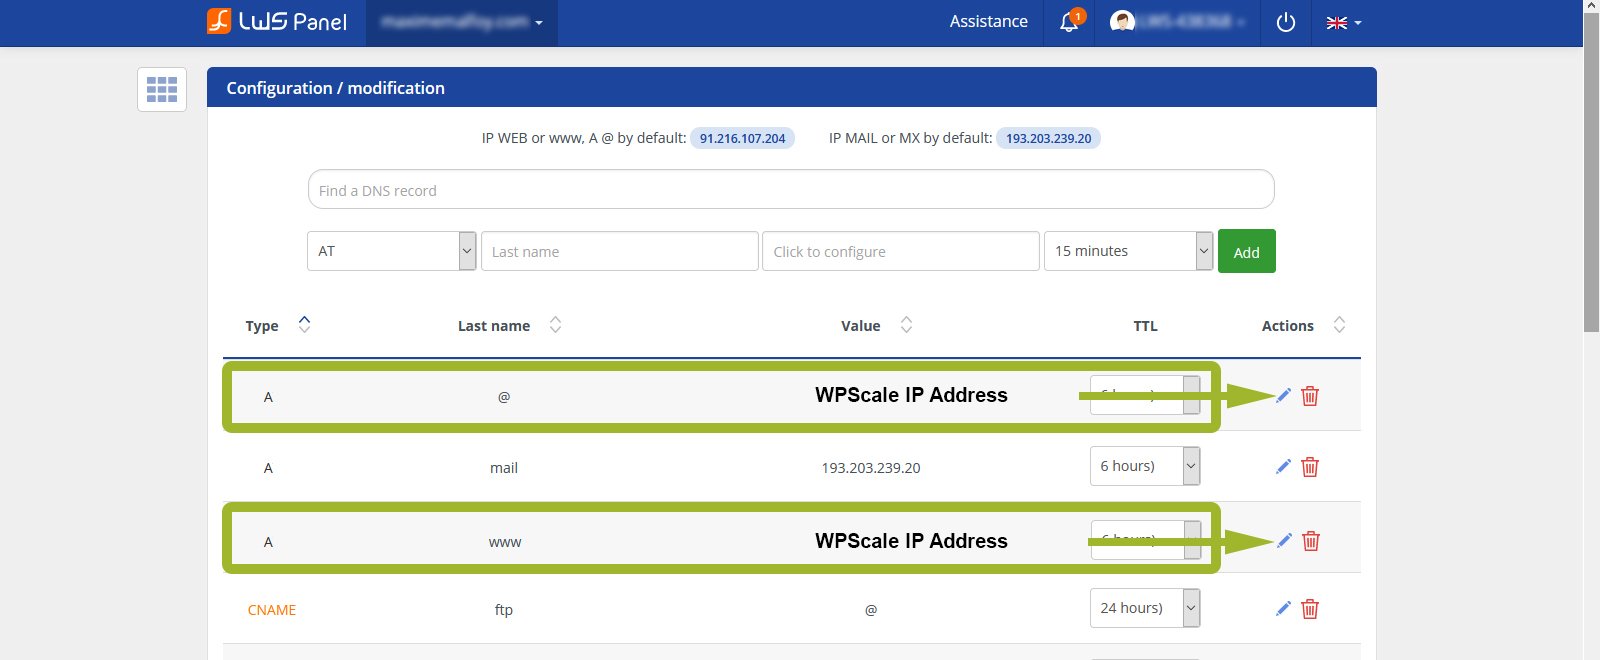
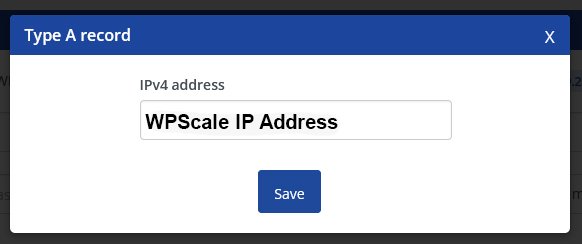
In the new page, you need to enter the IP address of your server in A fields (@ and WWW) and validate.
Once this has been done, you’ll see a message saying that your request has been taken into account. You just have to wait until this is effective, in particular by checking with the tool https://www.whatsmydns.net.
Now all you have to do is take the second step: Register the domain name in the WPScale console.
Wait and check that the DNS point to your WPScale IP
Then check if your DNS point to the WPScale IP using the verification tool at https://www.whatsmydns.net.
Be sure to wait until the DNS is propagated to all countries so that the Let's Encrypt certificate can be generated without error.
If this is the case, make the modification from the console with the button "Modification NDD", as in the following procedure: Register the domain name in the console.
Once this has been done, you need to modify all your URLs so that your site displays correctly, using your domain name rather than the temporary WPScale URL.
WPScale PROCEDURE
A few hours later (24 maximum), from your WPScale console, click the button to manage your WordPress, then click on "Modify domain name":
The change DNS window appears, and you just have to enter your domain name and validate:
Be careful: if you see an error message telling you that your domain name is not pointing to our servers, you must do this:
- Verify with the WhatsMyDNS tool that your domain is pointing to the IP address you see roughly on your WPScale account, or the dedicated IP address you ordered.
- Wait a few hours, the propagation time of your modified DNS zone.